PHPフレームワークのCodeIgniterを使ってみたい。
どうやってインストールするの?
わかりやすく教えて欲しい。
こういった疑問にこたえます。
この記事を読めば
- CodeIgniterをインストールする方法がわかる
CodeIgnterの導入は非常に簡単です。
慣れている人であれば10分で導入できます。
エンジニアの僕がわかりやすく解説します。
CodeIgniterのインストール方法
CodeIgniterのインストール手順は次の通りです。
CodeIgniterのインストール手順
- CodeIgntierファイルをダウンロードする
- サーバに CodeIgniter のフォルダとファイルをアップロードする
- config.phpファイルのベースURLを記述する
- database.phpファイルにデータベースの情報を記述する
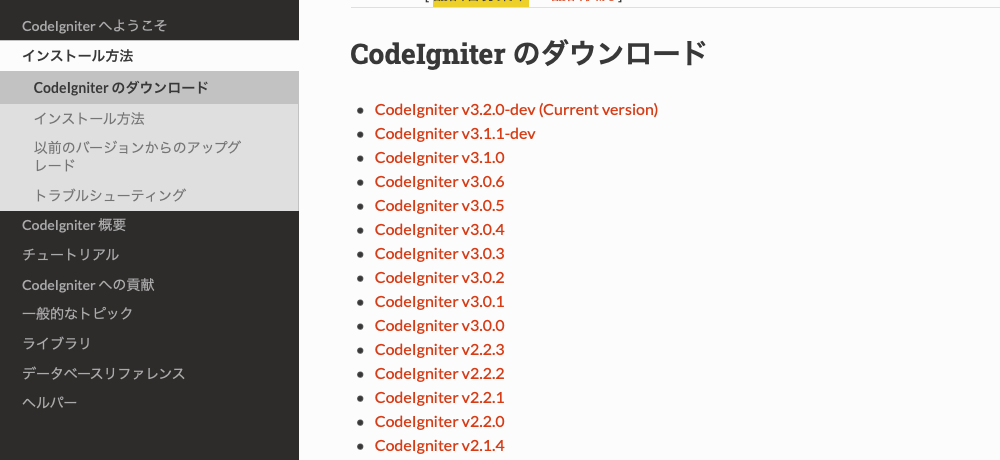
CodeIgniterのZIPファイルをダウンロードする
CodeIgniterのページからファイルをダウンロードします。
PHPのバージョンが最新の場合は一番新しいものを選んでおけば大丈夫です。
CodeIgniterのファイルをサーバにアップロードする
次にダウンロードしたCodeIgniterのファイルをサーバの公開ディレクトリに配置します。
配置したらそのURLにアクセスしてみましょう。
このようなページが表示されたらOKです。

config.phpにベースURLを記述する
application/config/config.phpにベースURLを記述します。
<?php
defined('BASEPATH') OR exit('No direct script access allowed');

/*
|--------------------------------------------------------------------------
| Base Site URL
|--------------------------------------------------------------------------
|
| URL to your CodeIgniter root. Typically this will be your base URL,
| WITH a trailing slash:
|
|	http://example.com/
|
| WARNING: You MUST set this value!
|
| If it is not set, then CodeIgniter will try guess the protocol and path
| your installation, but due to security concerns the hostname will be set
| to $_SERVER['SERVER_ADDR'] if available, or localhost otherwise.
| The auto-detection mechanism exists only for convenience during
| development and MUST NOT be used in production!
|
| If you need to allow multiple domains, remember that this file is still
| a PHP script and you can easily do that on your own.
|
*/
$config['base_url'] = 'http://localhost/test/codeigniter';
このコードはlocalhostのドキュメントルートのtest/codeigniterというディレクトリに配置している例です。
config.phpファイルにbase_urlを記述しておくとurlヘルパーのbase_url()関数で返されるので設定しておくと便利です。
database.phpファイルにデータベースの情報を記述する
application/config/database.phpにデータベースの情報を記述していきます。
<?php
defined('BASEPATH') OR exit('No direct script access allowed');

/*
| -------------------------------------------------------------------
| DATABASE CONNECTIVITY SETTINGS
| -------------------------------------------------------------------
| This file will contain the settings needed to access your database.
|
| For complete instructions please consult the 'Database Connection'
| page of the User Guide.
|
| -------------------------------------------------------------------
| EXPLANATION OF VARIABLES
| -------------------------------------------------------------------
|
|	['dsn']      The full DSN string describe a connection to the database.
|	['hostname'] The hostname of your database server.
|	['username'] The username used to connect to the database
|	['password'] The password used to connect to the database
|	['database'] The name of the database you want to connect to
|	['dbdriver'] The database driver. e.g.: mysqli.
|			Currently supported:
|				 cubrid, ibase, mssql, mysql, mysqli, oci8,
|				 odbc, pdo, postgre, sqlite3, sqlsrv
|	['dbprefix'] You can add an optional prefix, which will be added
|				 to the table name when using the  Query Builder class
|	['pconnect'] TRUE/FALSE - Whether to use a persistent connection
|	['db_debug'] TRUE/FALSE - Whether database errors should be displayed.
|	['cache_on'] TRUE/FALSE - Enables/disables query caching
|	['cachedir'] The path to the folder where cache files should be stored
|	['char_set'] The character set used in communicating with the database
|	['dbcollat'] The character collation used in communicating with the database
|				 NOTE: For MySQL and MySQLi databases, this setting is only used
| 				 as a backup if your server is running PHP < 5.2.3 or MySQL < 5.0.7
|				 (and in table creation queries made with DB Forge).
| 				 There is an incompatibility in PHP with mysql_real_escape_string() which
| 				 can make your site vulnerable to SQL injection if you are using a
| 				 multi-byte character set and are running versions lower than these.
| 				 Sites using Latin-1 or UTF-8 database character set and collation are unaffected.
|	['swap_pre'] A default table prefix that should be swapped with the dbprefix
|	['encrypt']  Whether or not to use an encrypted connection.
|
|			'mysql' (deprecated), 'sqlsrv' and 'pdo/sqlsrv' drivers accept TRUE/FALSE
|			'mysqli' and 'pdo/mysql' drivers accept an array with the following options:
|
|				'ssl_key'    - Path to the private key file
|				'ssl_cert'   - Path to the public key certificate file
|				'ssl_ca'     - Path to the certificate authority file
|				'ssl_capath' - Path to a directory containing trusted CA certificates in PEM format
|				'ssl_cipher' - List of *allowed* ciphers to be used for the encryption, separated by colons (':')
|				'ssl_verify' - TRUE/FALSE; Whether verify the server certificate or not
|
|	['compress'] Whether or not to use client compression (MySQL only)
|	['stricton'] TRUE/FALSE - forces 'Strict Mode' connections
|							- good for ensuring strict SQL while developing
|	['ssl_options']	Used to set various SSL options that can be used when making SSL connections.
|	['failover'] array - A array with 0 or more data for connections if the main should fail.
|	['save_queries'] TRUE/FALSE - Whether to "save" all executed queries.
| 				NOTE: Disabling this will also effectively disable both
| 				$this->db->last_query() and profiling of DB queries.
| 				When you run a query, with this setting set to TRUE (default),
| 				CodeIgniter will store the SQL statement for debugging purposes.
| 				However, this may cause high memory usage, especially if you run
| 				a lot of SQL queries ... disable this to avoid that problem.
|
| The $active_group variable lets you choose which connection group to
| make active.  By default there is only one group (the 'default' group).
|
| The $query_builder variables lets you determine whether or not to load
| the query builder class.
*/
$active_group = 'default';
$query_builder = TRUE;

$db['default'] = array(
	'dsn'	=> '',
	'hostname' => 'localhost',
	'username' => 'test_user',
	'password' => 'password',
	'database' => 'test_db',
	'dbdriver' => 'mysqli',
	'dbprefix' => '',
	'pconnect' => FALSE,
	'db_debug' => (ENVIRONMENT !== 'production'),
	'cache_on' => FALSE,
	'cachedir' => '',
	'char_set' => 'utf8',
	'dbcollat' => 'utf8_general_ci',
	'swap_pre' => '',
	'encrypt' => FALSE,
	'compress' => FALSE,
	'stricton' => FALSE,
	'failover' => array(),
	'save_queries' => TRUE
);
この例では、このようなデータベースを想定して記述しています。
データベース名: test_db
ユーザ: test_user
パスワード: password
以上でCodeIgniterのインストールは完了です。
CodeIgniterをインストールする方法!まとめ
解説の内容をまとめます。
CodeIgniterのインストール手順
- CodeIgntierファイルをダウンロードする
- サーバに CodeIgniter のフォルダとファイルをアップロードする
- config.phpファイルのベースURLを記述する
- database.phpファイルにデータベースの情報を記述する
インストールしたら次はこちらの記事がおすすめ


コメント